Okay, this part was a LOT of trial and error. I was very fortunate in that it was mostly trial and very little error. I started by proving it can be done before I bought anything. I borrowed a projector. I measured the minimum focus of that project. I tested using a mirror to redirect the image to make the size of the view bigger. I played with a number of different “rear projection” surfaces that would allow the right amount of light through and still give a crisp image.
Most projectors have a minimum “throw” distance of about 5’. And that actually gives about a 3’x2.25’ screen at 1024×768 resolution. Which (by pure luck) was the size of the inner part of my table, which would become the new map surface. So how do I get 5’ of distance from the front of the projector to the table? The mirror. I found that I had just enough space under my table if I aimed the projector down at the ground where a mirror would sit and redirect the image back up at the table. Projectors are designed to push the image up so the I could pretty much aim straight down and when it hit the mirror the reflection didn’t hit the projector.
First I pulled out the tunnel system we weren’t using and I set the mirror on the ground, hooked the projector to my laptop and held the projector and aimed it down at the mirror and saw the size of the image was almost perfect as it hit the bottom of the table. And it focused nicely! Now I have one more big problem… what do I project it against? I searched the net for cheap surface ideas and found that some people suggested taking two layers of wax paper and ironing them in a weave pattern. I did a test of this and it worked okay. I didn’t like the effort this was going to take, so I filed it as a backup plan, but kept looking for other ideas. The final proof of concept I needed was the Wiimote/IR pen to control the mouse. I had seen Johnny Lee’s Wiimote projects and knew that I just needed a bluetooth adapter and the source for his “Wiimote Whiteboard” which is available on his site. I ordered an IR pen online (these are available all over the place for about $8 to $10, or you can build your own if you want, but the parts will cost you around $5-$10). I tested this out and got it working with no problems and then I tested it through the wax paper and I was amazed that it worked very well!
This was proof of concept enough for me, so I pitched the idea to my wife and she said, “Let’s do it!” I was able to get a good deal on the projector which cost me about $350. It was used and new will probably run close to $500. I bought 4 IR pens, the bluetooth adapter, one piece of 3’x3’ 1/4” plexiglass, one piece of 3’x3’ 1/8” plexiglass and a 2’x2’ mirrored piece of plexiglass. I stopped at Ben Franklin still looking for a better projection surface and I asked the lady there and she suggested these “translucent” piece of plastic that they use for making quilt patterns. I wasn’t sure if it would work, but they were $1.99 each, so I bought 6 (this was enough to cover the full surface as each sheet was like 18”x24” or something). I got home, fired up the project and was AMAZED! It was way better than the wax paper.
For assembly, I removed the old map. Placed the 1/4” plexiglass on the top, placed the translucent layer in the middle, then sealed it with the 1/8” plexiglass. I used screws on each corner to hold it down. Now, I bought a tripod to hold the projector, adjusted it to aim at the mirror that I just set on the ground and bam! A few adjustments and the computer image was on the surface!
Finally I just taped a Wiimote to the side of the projector. The Wiimote is a camera that has a similar view as the projector so I figured (correctly) that if I aimed it at the mirror it would “just work.” Now, with the Wiimote setup, I ran the Wiimote whiteboard app and calibrated the surface using the IR pens.


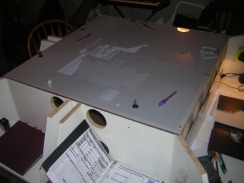
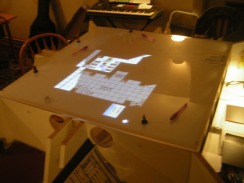
The first image used flash, so it’s crisp, but the image looks washed out because of the flash. The second image doesn’t use flash, so it’s blurry, but you can see the colors are very bright and visible. I used a cheap desktop to project the table and installed Maptools to display the map. Our DM just uses his laptop to host the game as though it’s an internet game and the game table connects. This means the laptop is the DM’s view where they can see everything (hidden monsters, traps, etc) and the game table only sees what the players can see.
We have found that using figs for PCs works well, you just have to move the on table token for the PC, then drop your fig on top of the digital token. We only use digital tokens to represent monsters as this makes the DMs job much easier. Now when a monster runs around the corner, it just disappears from our view, but the DM can see it fine on his screen!
That’s it! Feel free to ask me anything you want to know and I’ll do my best to answer! You can do it as a comment on here, on Twitter, or via e-mail.
Here is a talk-through of me showing how we use the table: Game Table Intro
Here is a few minutes of us doing combat: Combat 101

I wonder if you ever thought of patenting your idea and marketing it. With the right marketing this kind of design would have great application in all kinds of graphic arts, digital architecture, computer animation etc. Of course you may have to replace the Wiimote with a camera built specifically for the table (nintendo might not want to share).
If you have the time, could you make an instructable for this? This is freakin\’ genius.
Hey. first, the closest I have to "instructions" are what you see, what I\’ve written, and on my next blog entry which has some basic measurements.Patent? Not really. Honestly, all we did was build it using resources that are readily available (wiimote, projector, maptools). There isn\’t really anything special about this except all of the pieces have come together. I just want others to build similar tables and share their builds!
Did you find a deal on the plexiglas? Seems to be about $150 online.
Have you considered converting the surface into a touch enabled surface?MaximumPC has an article on building one, and you have 90% of what it requires done already. They project a series of Infrared lights through the side of the plexiglass, which when press down upon bends. When the plexiglass bends, the IR waves which had been bouncing around inside the plexiglass reflect down and would be picked up by the Wiimote. So it would basically just replace your light pens with players touching the surface.http://www.maximumpc.com/article/features/maximum_pc_builds_a_multitouch_surface_computer?page=0,0
Yeah, I considered that, but didn\’t want to have to write custom software to handle the touch/multi touch stuff. Besides wiring up all these lights, etc. Just not my idea of fun. Seriously, for what we do with it… it wouldn\’t be worth the trouble.
The plexiglass? Just look for local plastic suppliers and go in and ask. I went to Tap Plastics in Everett/Lynnwood (WA). It wasn\’t too bad. I can\’t remember the exact cost, but $150 is VERY expensive.
just to suggest an alternative to either wax paper or the quilter\’s sheets. I\’ve used the Frosted Glass spray product from Rustoleum ( http://www.rustoleum.com/CBGProduct.asp?pid=106 ) on plexiglass for other rear projection projects and it works wonderfully. however, those projects involved slide projectors and other light sources; not a video projector.
Genius. Pure genius.
I was wondering how the projecter was placed in the tabble, ex is it to the side and the mirror on an angle, pointing the projecter strate down at a mirror the projecter would get in the way of the reflection wouldnt it
This follow up post shows the projector: Follow Up
As you can see, the projector is nearly straight down. Most projectors are designed to send the image UP. This means, it will reflect above itself just fine.
Does it have to be 3×3, Is this a restriction from the maptools program? Wondering if one could have a 3×4 or 3×5 image area? I’d like to build a table that is for 7 players and 1 GM, not a square table.
Hey Jay,
No, it can be any size, as long as your projector can project the size you need in the given distance. The range my projector had (~5 feet) gave it a 3 foot wide image. It really depends on the model/quality of projector.